/ 01
Getting Started
Requirements, installing Fieldcraft (wp-admin and FTP), the child theme, activation, and a full walk through the guided setup wizard.
Fieldcraft works fully out of the box with Gutenberg, the native WordPress block editor — no page builder is required. Every marketing section is either a template part (on the home page) or a block pattern (everywhere else). If you'd rather build with a page builder, the guided setup wizard's Choose Your Builder step lets you pick Elementor (free, one-click install). Fieldcraft also includes real element/module support for WPBakery Page Builder and Divi Builder (both paid third-party plugins you supply your own license for) — see Choose your builder, below.
Requirements
Before you install anything, make sure your host meets these minimums. The setup wizard checks most of these for you automatically and flags anything missing on its first screen — see Step 0: Requirements, below.
| WordPress | 6.2 or newer (tested up to 6.6) |
|---|---|
| PHP | 7.4 or newer (8.x recommended) |
| PHP memory limit | 128M or higher |
| PHP extensions | cURL, GD, DOMDocument |
| Recommended | Post name permalinks (Settings → Permalinks) |
| Not required | Any page builder plugin — Gutenberg alone is enough. Elementor is offered as a one-click pick in the setup wizard; WPBakery Page Builder and Divi Builder are also supported if you activate your own licensed copy. |
What's in your download
Your ThemeForest download .zip contains:
fieldcraft.zip— the main theme, ready to upload in wp-adminfieldcraft-child.zip— the child theme starter (also bundled inside the main theme package so the setup wizard can install it for you with one click — see Step 0)Plugins/fieldcraft-core.zip— the companion plugin: required for the in-wizard demo import, the quote/newsletter forms, and the theme's SEO meta & JSON-LDDemo data/— the same demo files the companion plugin bundles: all 8 demos, including the flagship Ironhouse demo (folder namemechanical) and the 7 single-trade variants (Plumbing, Heating & Cooling, Electrical, Roofing, Handyman, Painting, Landscaping), each in their own subfolder with the same three files (contents.xml,widgets.wieandcustomizer.dat). Included as a visible backup copy; you don't need to touch these directly — the setup wizard's Import Demo Data step reads them automatically. See Demo Content for the full list of 8 demos.documentation.html— the quick-start file you can open right now, offline, from this folderLicensing/— your GPL and split-license paperwork
Install the main theme (wp-admin)
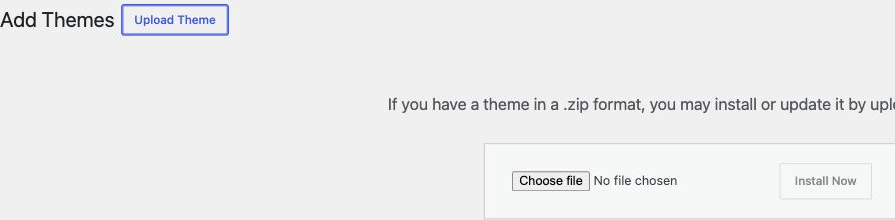
- Log in to your site's wp-admin, then go to Appearance → Themes → Add New → Upload Theme.
- Click Choose File and select
fieldcraft.zipfrom your download (do not unzip it first). - Click Install Now, then click Activate.
Install the main theme (FTP / file manager)
If your host's upload limit is too small for wp-admin, or you prefer file access, install by FTP instead:
- Unzip
fieldcraft.zipon your computer. You'll get a single folder namedfieldcraft. - Connect to your server with an FTP client (FileZilla, Cyberduck) or your host's file manager.
- Upload the whole
fieldcraftfolder into/wp-content/themes/on the server. - In wp-admin, go to Appearance → Themes, find Fieldcraft — that's the literal on-screen theme name; the theme is branded Fieldcraft everywhere else (the wp-admin dashboard menu, the setup wizard, this documentation) — and click Activate.
Activation
- Go to Appearance → Themes and click Activate on Fieldcraft.
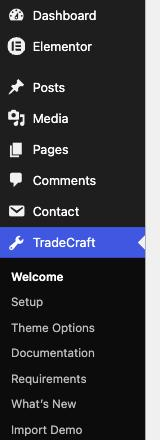
- WordPress redirects you straight into the Fieldcraft → Setup wizard the first time — this is the fastest path through everything below. If you land somewhere else, go to the Fieldcraft menu in the wp-admin sidebar (it's a top-level menu, not nested under Appearance) and click Setup.
The guided setup wizard, step by step
The setup wizard (Fieldcraft → Setup) is the fastest way to get from a blank install to a finished demo site. It walks through up to five screens — a Requirements check only appears if something needs fixing, then four numbered steps: Install Plugins, Choose Your Builder, Import Demo Data and Customize Your Site. Your progress is saved as you go, so closing the tab and coming back later always picks up where you left off.
Step 0: Requirements (only shown if something needs fixing)
If your host already meets every requirement, the wizard skips straight to Step 1 and you'll never see this screen. Otherwise:
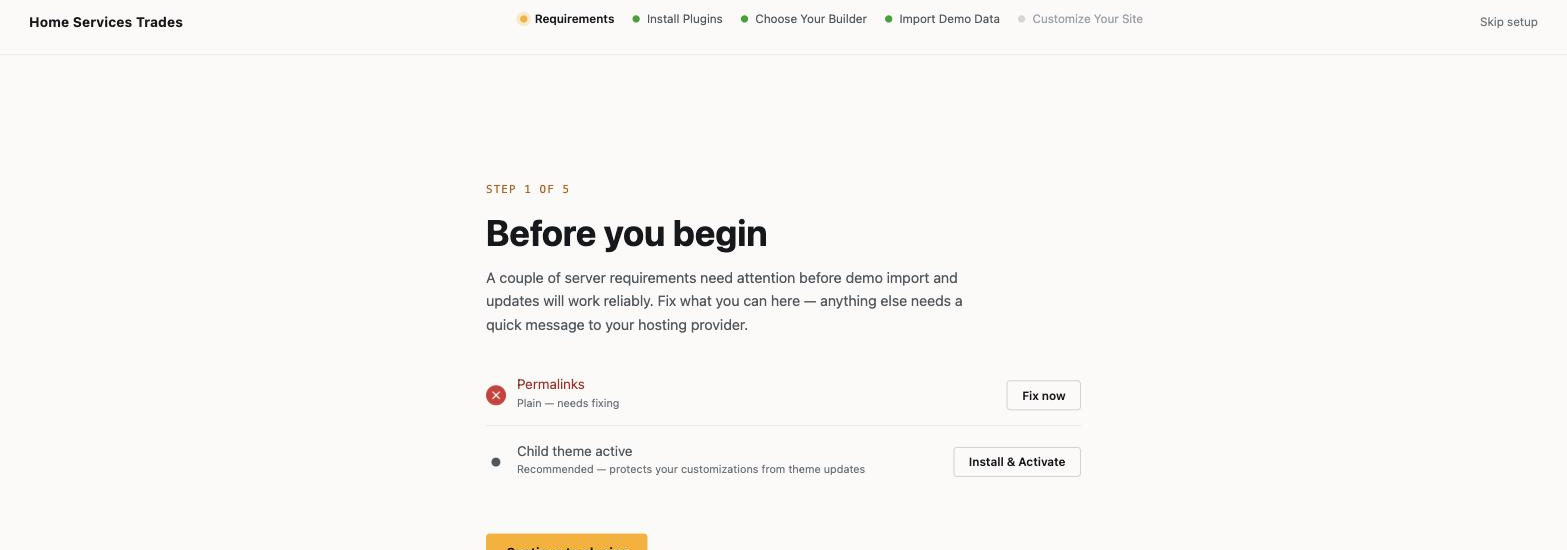
- Read the checklist — each row is either a green checkmark (already fine), a button you can click to fix it yourself, or a plain description of what to ask your host for.
- If Permalinks shows “Plain — needs fixing,” click Fix now. Fieldcraft switches your permalink structure to Post name and flushes rewrite rules for you — no need to visit Settings → Permalinks yourself.
- If Child theme active shows a plain circle instead of a checkmark, click Install & Activate. The wizard copies the child theme that's bundled inside your parent theme download into
wp-content/themes/and switches to it in one click — you never have to go back to your download and install it separately. - Rows like PHP version, memory limit, cURL, GD or DOMDocument have no fix button — they're facts about your server. Each row tells you exactly what to ask your hosting provider for.
- Click Continue to plugins once you've fixed what you can. Nothing here blocks you permanently — you can continue even with an unresolved advisory item, and every step keeps reminding you until it's actually fixed.
Any edits you make to the parent theme's files are erased the next time you update it. A child theme keeps your custom CSS and PHP in a separate folder that updates never touch. If you don't plan to edit theme code directly (most buyers don't — the Customizer, Theme Options page and block patterns cover almost everything), staying on the parent theme is fine and this row can be safely skipped.
Step 1: Install the required plugins
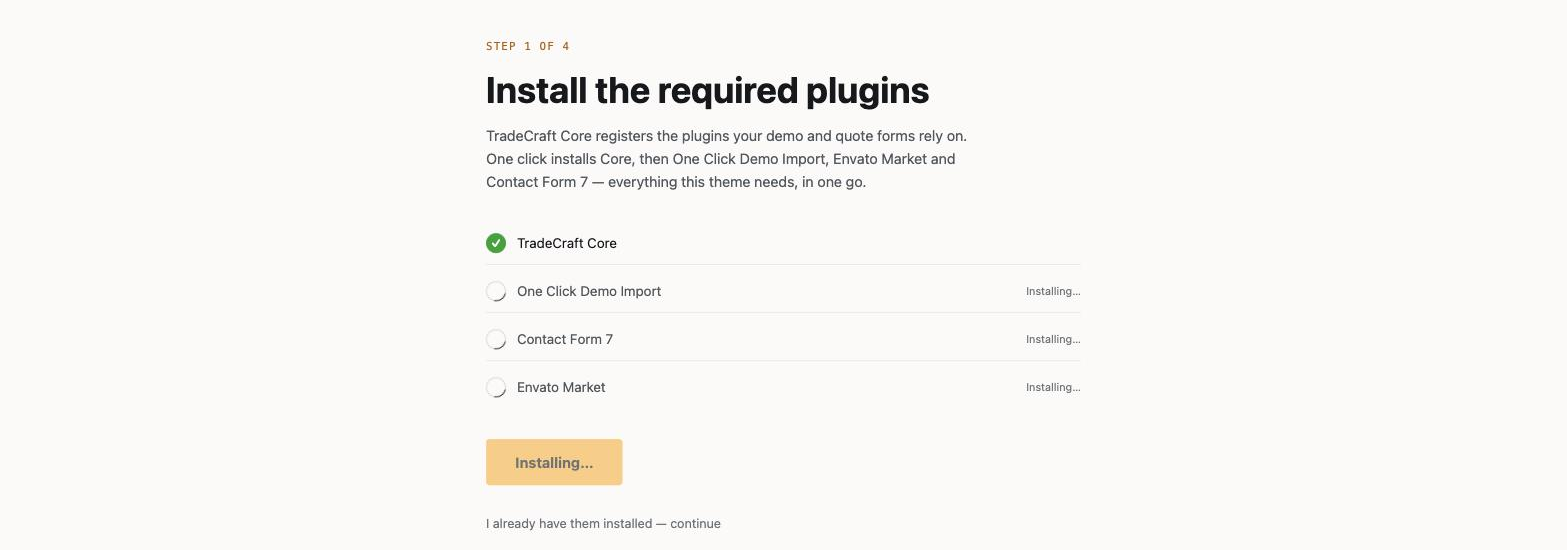
- Click the single Install required plugins button.
- Watch the checklist: Fieldcraft Core (the companion plugin) installs first if it isn't active yet, then One Click Demo Import, Contact Form 7 and Envato Market install and activate one after another. Each row shows a spinner while its plugin is actively installing, then swaps to a green checkmark the moment it's done — rows you haven't reached yet stay blank, not a static circle, so it's always clear which plugin is currently in progress.
- Wait for every row to show a checkmark. The wizard then auto-advances to Step 2 for you — no extra click needed.
Some hosts don't allow WordPress to write files directly. If you see a banner asking for credentials, either supply them, or upload Fieldcraft Core manually via Plugins → Add New → Upload Plugin and use the manual installer link the banner provides for the rest.
Already have these plugins installed? Click I already have them installed — continue under the button instead of re-running the installer.
Step 2: Choose your builder
- You'll see a card for each available builder. Gutenberg is marked Default and needs no install — it's the native WordPress block editor.
- To build with Elementor instead, click Select on its card. The wizard installs and activates it from WordPress.org in one click, the same way Step 1 installs its plugins, then marks that card active.
- Click Continue once your builder card is selected.

Fieldcraft also includes WPBakery Page Builder and Divi Builder compatibility — real elements/modules for all 22 signature sections exist for both, licensed separately (WPBakery from CodeCanyon or bundled with some other themes; Divi from elegantthemes.com) — but neither appears as a new pick on this screen. Fieldcraft cannot legally redistribute either premium builder. If a site already has WPBakery or Divi active (from before, or a direct option change), that builder's card still appears here, marked Active, and its elements/modules keep working normally. If you want to start using WPBakery or Divi from scratch today, install and activate your own licensed copy the normal way (Plugins → Add New → Upload Plugin), outside the wizard — Fieldcraft's elements/modules become available as soon as it's active, and this screen then shows its card as Active too. You can change your builder choice at any time by revisiting Fieldcraft → Setup; it is never a one-time, irreversible decision.
Real, wired-up demo content exists for Gutenberg (all 8 variants) and for Elementor (the flagship demo only, transcribed onto the imported Home page). Building with WPBakery or Divi means starting from a blank page and adding the elements/modules yourself — there's no pre-built demo layout for those two yet.
Step 3: Import demo data (in-wizard, no separate importer screen)
This step runs the demo import right here in the wizard — you never leave Fieldcraft → Setup or land on the One Click Demo Import plugin's own admin page. OCDI still does the underlying work; the wizard just drives it directly and shows its own progress bar in place of OCDI's screen.
- You'll see 8 demo cards, one per trade — the flagship “Fieldcraft — Ironhouse Mechanical (all trades)” plus 7 single-trade variants (Plumbing, Heating & Cooling, Electrical, Roofing, Handyman, Painting, Landscaping), each with its own preview thumbnail. Click the card that matches your trade to select it — the flagship demo is selected by default.
- Click Import selected demo.
- Watch the progress bar. It moves through three stages — “Importing content…,” “Applying colors and brand settings…,” then “Finishing up…” — and finishes with “Import complete!” Don't close the tab mid-import.
- Click Continue to Customize.
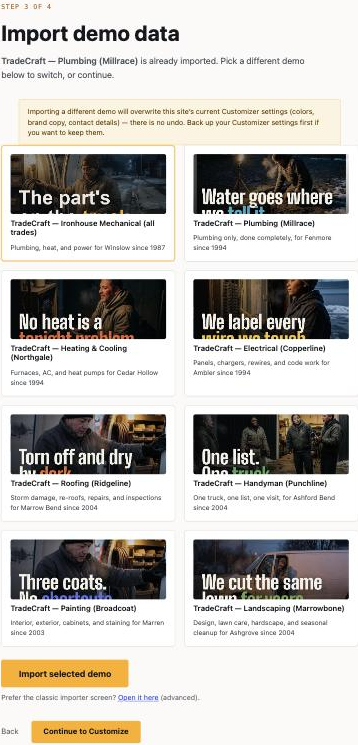
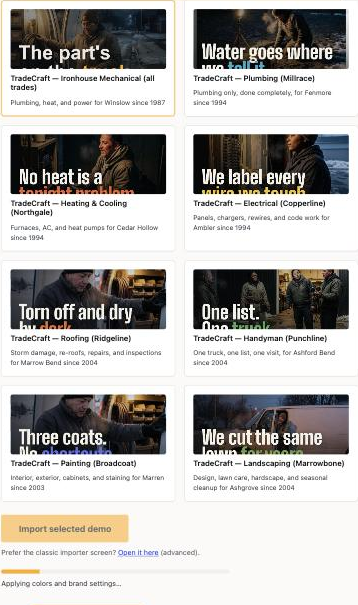
If you've already imported a demo and pick a different one, the wizard warns you first: importing a second demo overwrites this site's current Customizer settings (colors, brand copy, contact details) with no undo. Back up your settings first if you want to keep them — see Demo Content for the full explanation.
Prefer the classic importer screen? A link at the bottom of this step (“Open it here”) opens One Click Demo Import's own reparented admin page as an advanced fallback — the normal wizard flow never sends you there automatically.
Step 4: Customize your site (finishes setup)
- Read the confirmation — it names the demo you imported (or tells you that you're on a blank site if you skipped import) and shows your active builder choice.
- Click Open the Customizer.
Clicking that button does two things at once: it opens Appearance → Customize so you can set your phone number, logo, colors and home-page sections, and it marks setup as complete behind the scenes. Once that happens, the “Finish setup” admin notice stops appearing, and returning to Fieldcraft → Setup later always shows this completed confirmation screen instead of resuming mid-wizard.
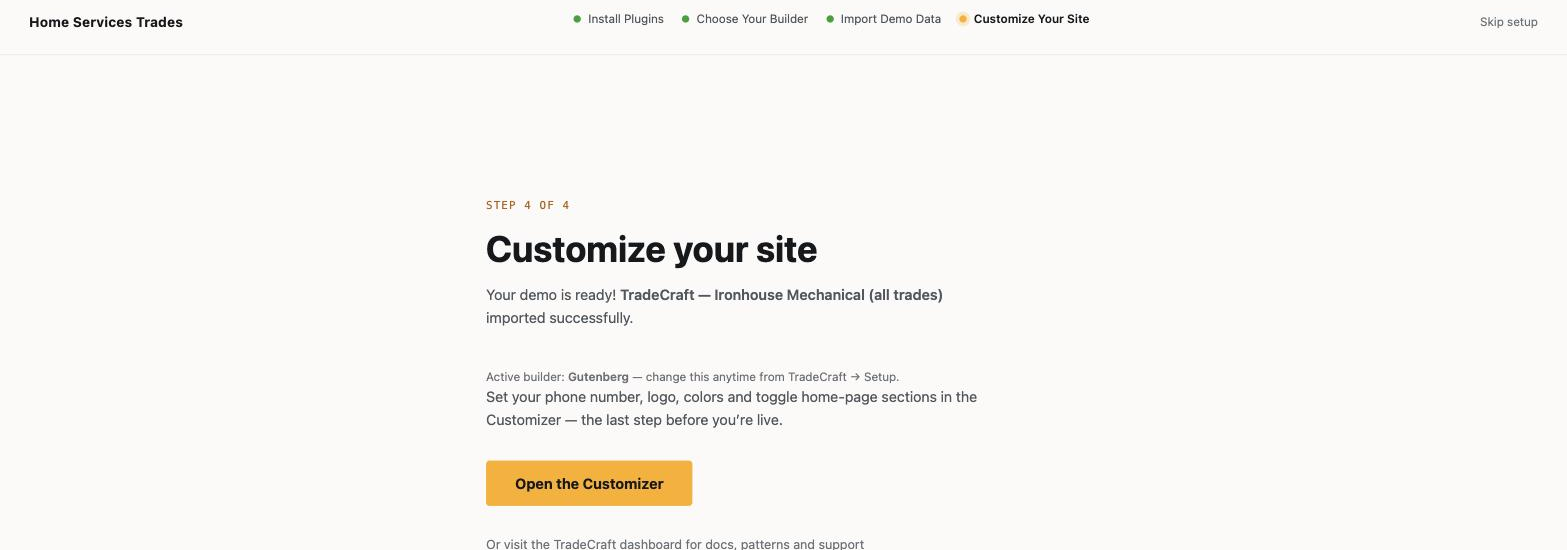
Skip setup is always available in the top-right corner of every wizard screen — nothing in this wizard is a mandatory gate. You can also return to Fieldcraft → Setup at any time after finishing, to switch demos, change builders, or re-run the plugin installer.
The companion plugin, if you install it manually
Fieldcraft ships a small companion plugin, Fieldcraft Core
(Plugins/fieldcraft-core.zip in your download). The setup wizard's Step 1
installs it for you automatically — the steps below are only needed if you're installing it
by hand instead:
- Plugins → Add New → Upload Plugin, choose
Plugins/fieldcraft-core.zip, click Install Now. - Click Activate Plugin.
Envato treats SEO meta output, form processing and demo-import glue as plugin territory, not theme territory — Fieldcraft ships none of that in the theme itself. The companion plugin adds it back. Concretely, it's required for: the in-wizard demo import, the quote-request and newsletter forms actually sending data anywhere, and the theme's JSON-LD/meta output (see SEO). The theme still looks and activates fine without it — but skip it and you'll be rebuilding the demo pages by hand and the forms won't do anything on submit.
The Fieldcraft admin menu, subpage by subpage
Fieldcraft adds one top-level Fieldcraft menu to the wp-admin sidebar (it is not nested under Appearance). Each area below is its own distinct subpage under that menu, navigated with WordPress's normal submenu sidebar:
changelog.html file, without leaving wp-admin.
If you've run the demo import above, your site already matches the live preview. Continue to Demo Content for exactly what's inside the demo package, or Site Setup to configure menus, logo and widgets.